Prince of Persia: The Sands of Time VFX breakdown video
MPC was involved from pre-production to create the mystical city of Alamut and the Golden Palace in Mike Newell's video-game adaptation, 'Prince of Persia: The Sands of Time'. Once the concept was signed off, the CG city was built using 20,000 buildings and 180,000 props. To achieve this, a layout tool would randomly distribute a series of different building types based on a grid structure. Separately, a packaging tool would add 60 different types of props, including washing lines, trees, piles of wood and pots. This tool would also allow the artists to make any adjustments needed.
MPC was also responsible for creating CG armies for the siege sequence which were simulated using MPC’s proprietary crowd system; Alice. For some of the shots over 10,000 agents were used, including soldiers with flags, citizens, horses and camels.
MPC VFX Supervisor Gary Brozenich and Producer Oliver Money led MPC’s team delivering 280 shots for the movie. MPC’s main areas of work included; the opening Dream Sequence, the Chimera attack, the final battle with Kronos, the Makhai warriors and Pegasus, as well as the Gods dying and dissolving, full CG temples, set extensions and a number of stunning DMP’s throughout.
We are the best Multimedia training institute in Bangalore, and we are known for Industry based training. We provide 3D Animation Courses and Visual Effects ( VFx ) Training with the latest and advanced training technologies in the Multimedia market. We also provide Placements in Reputed and Well-known Graphics and Multimedia industries.We also Provide Web and Graphic Designing with HTML5 and CSS3 which is one of the best Industry Based Training.
Placement Assistance
Our students are placed with some of the top studios, production house, advertising agency, & corporate organizations in the industry Apart from technical training & project work, Arena Animationprepares you for acareer in the animation,VFX & gaming industry. We provide regular job and recrutiment sessions totrain our students for job interviews. Students also benefit from placement workshops, Orbit Live, Creative Minds, Perspectives, job fairs/campus placements & more...!
Get Registered now for Better Experience in Animation and Multimedia
Among the most popular questions asked by newbies about Adobe Photoshop compatible plugins are:
Where do I install a plugin and how do I load it afterwards?
A plugin (or plug-in) is a computer program that integrates into another program adding new features and increasing functionality. Adobe lets you install plug-in filters from other software developers in its programs.
Some Photoshop compatible plugins have an installer that will guide you through the process.
But what should you do if plug-ins are not added in Photoshop?
How to install these files? It's as easy as pie.
All you need to do is to copy (or drag) the file into the Plug-Ins sub-folder of the Adobe Photoshopfolder.
The Adobe folder is typically located in Program Files on Windows and in Applications on Mac OS X.
If you have installed Photoshop in any other location you should look for the Plug-Ins folder there.
bear in mind that Photoshop must be closed when installing new plugins. Or you will need to restart the editor.
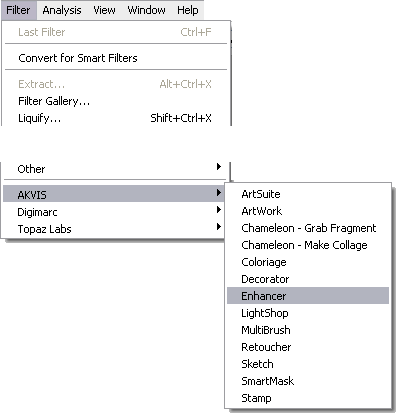
Next time you run Photoshop, the plugins will be available in the menu Filter:
Some Useful Tips:
Photoshop recognizes plug-ins located in subfolders and subdirectories inside the Plug-Insfolder.
You can classify your filters by developer or by task. Just create a new folder inside the Plug-Ins folder and put the files in it.
However, the list of plugins in the Photoshop menu (under Filter) looks different from the list in the Plug-Ins folder. In the Photoshop menu plug-ins are usually classified by developer.
Photoshop also recognizes shortcuts (Windows) and alias (Mac OS) within the Plug-Ins folder and subfolders.
Install your plug-in filters into any folder outside Photoshop, and then create a shortcut for the ".8bf" file (or "make alias" on Macintosh) and place it into the Plug-Ins folder.
With shortcuts you can manage your plugins quickly and safely.
Call the command Edit on Windows or Photoshop for Mac OS, then -> Preferences -> Plug-ins & Scratch Disk.
Select Additional Plug-ins Folder, then use the button Choose to select a folder or directory from the list.
Attention!
If you select the Additional Plug-ins Folder in Photoshop 32 bit, make sure that the folder does not contain the 64 bit files (64-bit version of the plugin), otherwise you will get an error message!
Note:
Some filters show up directly in the main Photoshop menu (typically between "Windows" and "Help" titles).
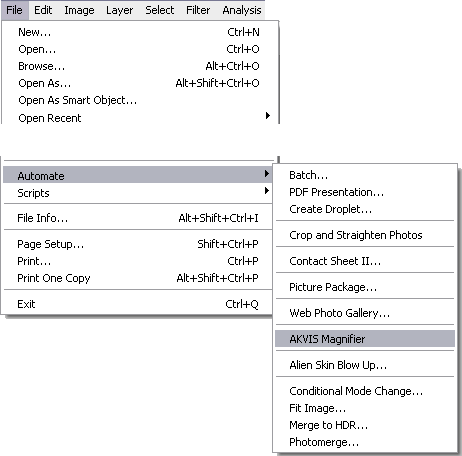
Some plugins (which change size of images) appear in the menu Automate, for example, the Magnifierplugin: File -> Automate -> AKVIS Magnifier.
See the video how to install a plugin in photoshop
Directed by Carl E. Rinsch, 'The Gift' Belongs to the "pararell Lines" Phillips Cinema campain. Placed in Russia, The Gift is a Sci-Fi short with a savage Chase sequence on it. We made more than 20 full CGI shots for the short. Check out the animated pictures to see how it has been done. We also made the vehicles and some characters desingns. We enjoyed creating such an unusual atmosphere and sense. Not the regular Sci-fi film we are used to see...
what is needed to make a website: a browser and Notepad (or similar text editor). Since you are reading this, you most likely already have your browser open. The only thing you need to do is to open an extra browser window (open the browser one more time) so you can read this tutorial and see your new website at the same time.
open Notepad (in Accessories under Programs in the Start menu):
Let us start with something simple. How about a page that says: "Hurrah! This is my first website." Read on and you'll find out how simple it is.
HTML is simple and logical. The browser reads HTML like you read English: from the top down and from left to right. Thus, an simple HTML document begins with what should come first and ends with what should come last.
The first thing you need to do is to tell the browser that you will "talk" to it in the language HTML. This is done with the tag <html> (no surprises there). So before you do anything else type "<html>" in the first line of your document in Notepad.
As you may recall from the previous lessons, <html> is an opening tag and must be closed with a closing tag when you are finished typing HTML. So to make sure you don't forget the HTML close tag now type "</html>" a couple of lines down and write the rest of the document between <html> and </html>.
The next thing your document needs is a "head", which provides information about your document, and a "body", which is the content of the document. Since HTML is nothing if not logical, the head (<head> and </head>) is on top of the body (<body> and </body>).
Your document should now look like this:
<html>
<head>
</head>
<body>
</body>
</html>

Note how we structured the tags with new lines (using the Enter key) as well as indents (using the Tab key). In principle, it does not matter how you structure your HTML document. But to help you, and others reading your coding, to keep an overview, it is strongly recommended that you structure your HTML in a neat way with line breaks and indents, like the above example.
If your document looks like the above example, you have made your first website - a particularly boring website and probably not what you dreamt of when you started this tutorial but still some sort of a website. What you have made will be the basic template for all your future HTML documents.


So far so good, but how do I add content to my website?


As you learnt earlier, your HTML document has two parts: a head and a body. In the head section you write information about the page, while the body contains the information that constitutes the page.

For example, if you want to give the page a title which will appear in the top bar of the browser, it should be done in the "head" section. The element used for a title is title. I.e. write the title of the page between the opening tag <title> and the closing tag </title>:


<title>My first website</title>


Note that this title will not appear on the page itself. Anything you want to appear on the page is content and must therefore be added between the "body" tags.


As promised, we want the page to say "Hurrah! This is my first website." This is the text that we want to communicate and it therefore belongs in the body section. So in the body section, type the following:


<p>Hurrah! This is my first website.</p>


The p in <p> is short for "paragraph" which is exactly what it is - a text paragraph.


Your HTML document should now look like this:


<html>
<head>
<title>My first website </title>
</head>
<body>
<p>Hurrah! This is my website.</p>
</body>
</html>


Done! You have now made your first real website!

Next all you have to do is to save it to your hard drive and then open it in your browser:

In Notepad choose "Save as..." under "File" in the top menu.
Choose "All Files" in the "Save as type" box. This is very important - otherwise, you save it as a text document and not as an HTML document.
Now save your document as "page1.htm" (the ending ".htm" indicates that it is an HTML document. ".html" gives the same result. I always use ".htm", but you can choose whichever of the two extensions you prefer). It doesn't matter where you save the document on your hard drive - as long as you remember where you saved it so you can find it again.


Now go to the browser:


In the top menu choose "Open" under "File" (or press CTRL+O).
Click "Browse" in the box that appears.
Now find your HTML document and click "Open".


It now should say "Hurrah! This is my first website." in your browser. Congratulations!


if you are interested in web designing, get a complete course in web designing visit  Arena Animation Basavanagudi