Showing posts with label Photoshop. Show all posts

Thursday, September 11, 2014

Drawing a Shape

Udemy Photoshop Pen Tool 01
Before you even get started, first thing’s first. Create a new Photoshop file, name it whatever you want, and set it to any size you feel comfortable working in. We’re just going to be experimenting for now, so it doesn’t really mater.
Next, locate the pen tool. It should be in the toolbar on the left, in the same section as the path selection tool, horizontal type tool, and the polygon tool, represented by the fountain pen icon. Or, you can press P to bring it up immediately.
Once you’re ready, let’s get drawing!
Step 1 – Create a new layer, and set up shape layers
Udemy Photoshop Pen Tool 02
Select the drop-down menu to the right of the pen tool icon at the top of the window. There should be three options total: shape, path, and pixels. Select the shape option, since we’re going to start this tutorial out by drawing shapes, and choose a fill color for your shape. Also make sure you’re working in a new layer.
This next part is optional, but if you’d like to work in a grid to make plotting points more precise, press Ctrl+’ (that’s the apostrophe key), and enable snap by pressing Shift+Ctrl+; (the semi-colon key). Or, simply go to View > Snap using the menu at the top.
Step 2 – Plot points to create your shape
Udemy Photoshop Pen Tool 03
Next, start plotting points on your grid to create your shape. Think of it like a game of connect-the-dots. You can start to visualize how your image is made up of various points, with straight lines connecting each point. As you plot these points, the pen tool will automatically begin filling the image in.
In the example above, you can see the makings of a very oddly proportioned gold star. Don’t worry if your shape is perfect, this is just an experiment.
Udemy Photoshop Pen Tool 04
Once you’re ready to connect the final dot and complete your shape, just click the point you started out with. When you hover over the initial point for your shape, the pen tool cursor will appear with a small circle next to it, as in the example above.
Step 3 – Making curves with the pen tool
Udemy Photoshop Pen Tool 05
You’ll notice something interesting happen if you plot a point and drag your cursor, rather than releasing click. That point will become an anchor for a curved line, which you can manipulate as long as you hold down the left click button after placing the point. You can use this to create shapes with curves, rather than rigid shapes composed only of straight lines, like our star example.
Wow!
Wow!

Cut an Image Out Using the Pen Tool

Udemy Photoshop Pen Tool 07
The pen tool can also be used to map out a custom selection. This is useful if you want to cut out only part of an image, like the sign in the example above, and not the whole image.
Before you begin, make sure your image is on a new layer, and that you’ve selected the path option in the pen tool menu. We’re going to be mapping a path this time, not drawing a shape. If you leave the shape option selected, we’ll just be drawing a shape over our sign rather than preparing to cut it out.
You might be asking yourself what a path is in Photoshop. A path is basically the line that connects two points. In Photoshop, even though we can “draw” a path using the pen tool, the path is not actually an image itself. There are no pixels involved. Remember what we learned about vector graphics and raster graphics?
Step 1 – Start mapping points!
There are two major steps in this guide, and the first uses techniques we learned in the previous guide. Just map points around the image you want to select, as though you were drawing out its shape.
Udemy Photoshop Pen Tool 08
You can zoom in if you want to be more precise. This image in particular is fairly easy to trace, because it’s made up of straight lines. Don’t forget to close the shape by clicking its starting point!
Udemy Photoshop Pen Tool 09
Step 2 – Load your path as a selection

This path doesn’t mean anything for what we want to do until we load it as a selection. Do this by clicking the Paths tab in the Layers swatch – there should be a path called Work Path in the shape of the object you just traced – and clicking the icon of the dotted line circle, as seen on the left.
You should see the part of your image that you outlined with a path highlighted with the dotted line, showing that it’s selected and ready to be cropped. You can do this quickly by using the shortcut Ctrl+J, which copies and pastes the selection onto a new layer. If you set the two layers beneath it to invisible, by unchecking the eye icons in the Layers swatch, you can see your newly cut-out sign over a transparent background!
Udemy Photoshop Pen Tool 10
Now you can overlay your sign on new backgrounds by taking advantage of layers.


Tuesday, September 9, 2014


Photoshop Tool Basics

This is a quick summary of Photoshop’s Tools palette with a description of each tool’s functions and shortcuts. Great for those brand new to Photoshop.
I decided to start at the beginning. The very beginning. For those people who just “picked up” a copy of Photoshop and have no idea what to do with it. The keyboard shortcut is in ( ).
tool_basics1

Rectangular Marquee Tool (M)

Use this tool to make selections on your image, in a rectangular shape. This changes the area of your image that is affected by other tools or actions to be within the defined shape. Holding the [Shift] key while dragging your selection, restricts the shape to a perfect square. Holding the [Alt] key while dragging sets the center of the rectangle to where your cursor started.

tool_basics2

Move Tool (V)

Use this tool to, well, move things. Usually you use it to move a Layer around after it has been placed. Hold the [Shift] key to limit the movements to vertical/horizontal.

tool_basics3

Polygon Lasso Tool (L)

Ok, this should be the Lasso Tool, but I use the Polygon Lasso a lot more often. Use this to draw selections in whatever shape you would like. To close the selection, either click on the beginning point (you’ll see the cursor change when you’re on it), or just double-click. When holding the [Ctrl] key, you’ll see the cursor change, and the next time you click, it will close your selection.

tool_basics4

Magic Wand Tool (W)

Use this to select a color range. It will select the block of color, or transparency, based on wherever you click. In the Options Bar at the top, you can change the Tolerance to make your selections more/less precise.

tool_basics5

Crop Tool (C)

The Crop Tool works similarly to the Rectangular Marquee tool (see above if you have no short-term memory). The difference is when you press the [Enter/Return] key, it crops your image to the size of the box. Any information that was on the outside of the box is now gone. Not permanently, you can still undo.

tool_basics6

Slice Tool (K)

This is used mostly for building websites, or splitting up one image into smaller ones when saving out. It’s kind of an advanced tool, and since you’re in here for the basics, we’ll kind of skip over it. Kinda makes you mad I made you read all that for nothing, huh?

tool_basics7

Healing Brush Tool (J)

This is a really useful tool. Mildly advanced. You can use this tool to repair scratches and specs and stuff like that on images. It works like the Brush tool (see below). You choose your cursor size, then holding the [Alt] key, you select a nice/clean area of your image. Let go of the [Alt] key and paint over the bad area. It basically copies the info from the first area to the second, in the form of the Brush tool. Only, at the end, it averages the information, so it blends.

tool_basics8

Brush Tool (B)

This is one of the first tools ever. It’s what Photoshop is based off of. Well, not really, but it’s pretty basic. It paints one your image, in whatever color you have selected, and whatever size you have selected. There’s a lot of options for it, but this is basic, so you don’t get to learn them. Ha.

tool_basics9

Clone Stamp Tool (S)

This is very similar to the Healing Brush Tool (see above). You use it the exact same way, except this tool doesn’t blend at the end. It’s a direct copy of the information from the first selected area to the second. When you learn to use both of these tools together in perfect harmony, you will be a Photoshop MASTA! Not really, it’s just less irritating.

tool_basics10

History Brush Tool (H)

This tool works just like the Brush Tool (see above) except the information that it paints with is from the original state of your image. If you go Window>History, you can see the History Palette. The History Brush tool paints with the information from whatever History state is selected.

tool_basics11

Eraser Tool (E)

This is the anti-Brush tool. It works like an eraser (duh) and erases whatever information wherever you click and drag it. If you’re on a Layer, it will erase the information transparent. If you are on the background layer, it erases with whatever secondary color you have selected.

tool_basics12

Gradient Tool (G)

You can use this to make a gradiation of colors. Gradiation doesn’t appear to be a word, but it makes sense anyway. It creates a blending of your foreground color and background color when you click and drag it. Like a gradient.

tool_basics13

Blur Tool (R)

The Blur tool is cool. It makes things blurry. Click and drag to make things blurry. The more you click and drag, the blurrier things get.

tool_basics14

Dodge Tool (O)

This tool isn’t as crappy as the car brand. It’s actually used to lighten whatever area you use it on. As long as it is not absolute black. Absolute black won’t lighten.

tool_basics15

Path Selection Tool (A)

You use this tool when working with paths. Since this is all about the basics, I won’t go into details. It’s related to the Pen Tool (see below) though.

tool_basics16

Horizontal Type Tool (T)

It makes type. Or text. Or whatever you want to call it. You can click a single point, and start typing right away. Or you can click and drag to make a bounding box of where your text/type goes. There’s a lot of options for the Type Tool. Just play around, it’s fairly straight-forward.

tool_basics17

Pen Tool (P)

I mentioned this tool above. It’s for creating paths, in which you would use the Path Selection Tool to select the path. Paths can be used in a few different ways, mostly to create clipping paths, or to create selections. You use the tool by clicking to add a point. If you click and drag, it will change the shape of your path, allowing you to bend and shape the path for accurate selections and such.

tool_basics18

Rectangle Tool (U)

By default it draws a Shape Layer in the form of a rectangle. It fills the rectangle with whatever foreground color you have selected. It’s pretty complicated, don’t hurt yourself with this one.

tool_basics19

Notes Tool (N)

Like post-it notes, but digital. You can use this tool to add small little note boxes to your image. These are useful if you’re very forgetful or if you’re sharing your Photoshop file with someone else. I’m pretty sure it only works with .PSD files.

tool_basics20

Eyedropper Tool (I)

This tool works by changing your foreground color to whatever color you click on. Holding the [Alt] key will change your background color.

tool_basics21

Hand Tool (T)

You can really make short work of your job with the Hand Tool. It’s for moving your entire image within a window. So if you’re zoomed in and your image area is larger than the window, you can use the Hand Tool to navigate around your image. Just click and drag. You can get to this tool at any time when using any other tool by pressing and holding the [Spacebar].

tool_basics22

Zoom Tool (Z)

Pretty obvious what this tool does. It allows you to zoom into your image. Don’t be dumb, it doesn’t actually change the size of your image. Hold the [Alt] key to zoom out. Holding the [Shift] key will zoom all of the windows you have open at the same time. Double-click on the Zoom Tool in the palette to go back to 100% view.

tool_basics23

BONUS!!

These are your color boxes. Foreground (in the front) and Background (in the back). Click on either one to bring up the color select dialog box.


Monday, September 8, 2014

Getting Started with Photoshop

Getting Started with Photoshop


Getting Started Photoshop

Photoshop User Interface

The Photoshop Workspace

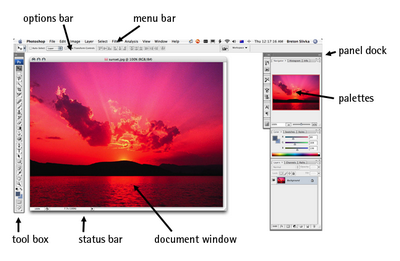
Photoshop’s “out of the box” workspace consists of the following components:
  • menu bar – You will probably already be familiar with the menu bar from other programs. This runs across the top of your Photoshop window, and contains various menu options for Photoshop’s tools.
  • options bar – The options bar sits beneath the menu bar and holds contextualized options for different tools. It also contains the workspace menu, where you can save and load arrangements of palettes.
  • toolbox – By default, the toolbox sits to the left of your Photoshop window, and contains shortcuts to Photoshop tools.

Customizing your Workspace
You can customize your Photoshop workspace to suit you or your project — almost everything within your workspace can be repositioned and reconfigured! You might choose to customize your workspace.
changing the look of the menu bar
You can change which menu items are visible in your menu bar, and even add color to your menu items. If you wanted, you could also assign new or different keyboard shortcuts to menu commands (which I don’t recommend until you feel very comfortable with Photoshop or have a compelling reason to do so!). Go to Edit > Menus and use the dialog box to modify the menu bar and palette menus.


Get Registered Now and Become an EXPERT in Photoshop